Tuesday, September 29, 2020

Raising Turkeys: the Possibilities

Raising Turkeys: the Possibilities

 Five Ideas for What to Do With All That Turkey Meat.


We usually start off our year with six turkey chicks.  On average, we’ve lost one turkey per year.  It is important not to let your turkeys grow too large or they risk death by heart attack. We learned that our first year raising turkeys. This year we harvested all six turkeys.  


1: Smoke And Slice the Turkey Breast

This is a delicious and cost savings way to use your turkey.  This cold cut turkey in the deli is $9/pound at least.  By packaging these in small portions and freezing, you will be able to enjoy it all year round.


2: Turkey Pot Pie


Find yourself a delicious recipe and cook up some turkey pot pies.  We have a large family and so we use full size aluminum casserole pans to freeze for ready made meals later in the year.  The nice thing is you could make these to whatever size your family needs. This is a great use of the extra turkey bones with meat that are harder to freeze in nice sized portions.  We make these the day the turkeys come back as meat.  Many times there is extra turkey broth from this project and that also could be frozen or even canned for later meals.


3: Frying a Turkey 


This is the first year we have tried this and it was fantastic for a whole family get together.  It was fried in peanut oil for one hour and then cooled here for a good 20 minutes prior to cutting and serving.

4: The Classic Thanksgiving Turkey 


We have enjoyed home grown thanksgiving turkey a few years now.  It feels wholesome and connects this family tradition to our history laden holiday in a deeper way.  Having this with our canned vegetables is very satisfying.

5: Selling or Bartering With Other Farmers

We are blessed to have a maple syrup farmer to trade a turkey for their delicious maple syrup.  This is a relationship that has been built and have continued for the same number of years that we have raised turkeys.  We would love to continue to network with other farmers to barter for other desired items.


Thursday, September 24, 2020

Green Beans; A Plentiful Harvest

Green Beans; A Plentiful Harvest

Canning That Produce


Picking those fresh green beans is a job for the whole family.

Preparing the green beans for canning by washing and snipping the ends.

Washing the canning jars and lids.

Stuffing the jars as full as possible.


Adding 1tsp of canning salt for a quart of green beans and water to the base of the rim.


Sterilizing the lids by boiling for two minutes.


Placing the complete cans in the pressure cooker.


Pressure cooking for 20 minutes.  It takes quite a while of boiling for the pressure cooker to build up enough pressure to be ready.  There is a pressure release valve that pops up when it is ready.  That’s when you start the 20 minute timer.


It takes a long time after the 20 minutes of time pressure cooking for the pressure to decrease to a safe level to open the pressure cooker.  The cans will then be moved to a towel and wrapped together to slow the cooling process.  


Once we canned enough green beans, we still had enough extra that we sold them in our virtual farm stand.  We had plenty to eat ourselves as well.  Fresh green beans are delicious and enjoying your own canned beans later in the year is very satisfying.  Beans are fairly easy to cultivate and a few plants give a lot of beans. Give it a try a provide for yourself a very healthy home grown food.


This is the photo Amelia submitted to 4H for their first virtual exhibit hall 2020.  Check out all of the 4H projects done by Amelia and her siblings at our 4H post.


Laying the overgrown beans out on some paper in the sun, helps the bean to dry up and be ready for storing.  When the bean is dry and firm, it is ready for cracking.  This is more then enough for next year’s planting. They can also be used from a family recipe of homemade brown beans..


Monday, September 14, 2020

4H Exhibit Hall

 4H Exhibit Hall is Virtual 2020

Live Now and until September 15th; click the above link to see all the 4H projects.  My kids’ projects are captured in images and saved below!


We are very grateful that the 4H leadership was able to pull together a way for the kids to show their projects that they have been working hard on all year.  The virtual exhibit hall was a satisfying way to view the projects this year and the ribbons they earned.  It is a little tricky to navigate, so I did take screenshots of all the kids projects on display.


Amelia Rose: Clover bud 

Green ribbons are given to all clover buds for participating.  Maximum number of entries this year was 3.  Here are Mia’s three displays:


These pictures above are hard to see.  The one on the left is Mia’s LEGO village.  Acadia is a clover bud as well and her LEGO creation is on the right.  It is a farmyard.  She also worked on caring for her new chicks and took a great photo of one that she entered in the photography set.


Alexia’s full projects was too much to display on this virtual wall and so only one photo is shown here for her Khaki Campbell project.  This is the link to her blog post showing her entire project.  See also her photography and chicken swing projects below. She won a blue ribbon in each of her categories!  She had her name drawn and won a tractor supply giftcard.


Jordan’s Maine Maple Syrup


You can see Jordan’s full project on his blog post Maine Maple Syrup.  He won a blue ribbon for his hard work.

I hope you had an interesting view of the virtual 4H fair.  I rushed through this post because I wanted it up in time for the above link to still be active.


Friday, September 11, 2020

The Adventure of Moving a Chicken Coop

 The Adventure of Moving a Chicken Coop


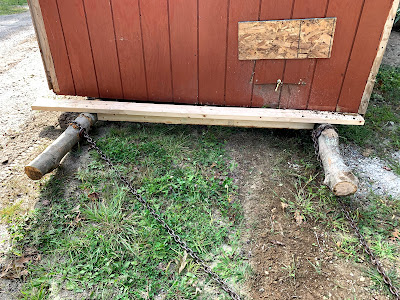
You know when you look in a room and you know that it'll be better if the couch is over there, well that is how we are viewing the backyard.  We have a nice big barn up and are changing the landscape enough, that it just seems natural to move the original chicken coop to a new spot on the farm side of the yard.  In the photo above, you can see the coop is already prepped for the move.  Two nice size trees were cut down where the pasture is going and they will be the sleigh poles for the big move.


First, we needed to move the girls to safety so that they weren't frightened during the big move.  They had fun checking out the barn.  We left them the ladder to keep them busy.  

After the trees were cut and ready, Pepere Larry asked for a lot of bits of scrap wood and this is why.  We used them to lever the building up one corner at a time and slide in a piece of wood at time to keep lifting it higher and higher until the trees could slide underneath one on each side.  It sounds simple, but it was a lot of work and made a little more difficult, due to a stump under the coop.


Here are the poles, supported by two by fours to hold the poles in place under the coop.  The chains are attached and the truck will pull this a little at a time to the new location.

One, two, three... pull!


The coop is off the stump and moving in the right direction.


We're making great progress moving this coop across the lawn, but the ditch is the challenge ahead of us.


Pepere Larry suggests we leave it right here in front of the play set.  Good thing, I knew he was kidding.


Look at this accomplishment! Right over the ditch with the next try.  


 A little further and a turn and we have the final placement!  The permanent blocks are placed underneath for support and the logs are removed.  


So here is our plan and part of the excitement of this big move.  The newer coop with the front porch and the original coop that is now in front will have a chicken run between them where the girls can mingle and be safe all together.  The coop will also be closer to the barn for getting chores done etc.  
This took two days of work.  I know this post makes it look easy, but Pepere Larry and Justin worked their tails off and I helped quite a bit as well.  We have also spent some of our week working on the interior of the barn.  Check out the update at the post:  Building a Barn, the Finishing Touches.